
Saat memakai custom element, mungkin terdapat kondisi di mana kita memerlukan custom element berada di dalam custom element lain. Misalnya, banyak website sekarang ini yang memperlihatkan data berupa daftar, entah itu daftar artikel maupun item belanja.
Pada umumnya setiap daftar yang ditampilkan ditampung pada sebuah container <div>. Kemudian item yang sama ditampilkan secara berulang dengan data yang berbeda pada container itu.

Web component bisa mempermudah dalam mengatur daftar item yang ditampilkan dalam wujud daftar memakai container. Caranya kita membuat dua custom element yatu container dan itemnya. Container dipakai untuk menampung elemen item di dalamnya. Disamping itu pada container juga data (array) diberikan. Nantinya container-lah yang akan membuat elemen item di dalamnya berdasarkan data yang diberikan.
Belum terbayang seperti apa? Berikut contohnya:
-
- index.html
-
- <!DOCTYPE html>
-
- <html>
-
- <head>
-
- <meta charset=“utf-8”>
-
- <meta name=“viewport” content=“width=device-width”>
-
- <title>repl.it</title>
-
- <link href=“style.css” rel=“stylesheet” type=“text/css” />
-
- </head>
-
- <body>
-
- <script src=“script.js” type=“module”></script>
-
- </body>
- </html>
-
- script.js
-
- import “./article-list.js”;
-
- import articles from “./articles.js”;
-
- const articleListElement = document.createElement(“article-list”);
-
- articleListElement.articles = articles;
- document.body.appendChild(articleListElement);
-
- article-list.js
-
- import “./article-item.js”
-
- class ArticleList extends HTMLElement {
-
- set articles(articles) {
-
- this._articles = articles;
-
- this.render();
-
- }
-
- render() {
-
- this._articles.forEach(article => {
-
- const articleItemElement = document.createElement(“article-item”);
-
- // memanggil fungsi setter article() pada article-item.
-
- articleItemElement.article = article;
-
- this.appendChild(articleItemElement);
-
- })
-
- }
-
- }
- customElements.define(“article-list”, ArticleList);
-
- article-item.js
-
- class ArticleItem extends HTMLElement {
-
- set article(article) {
-
- this._article = article;
-
- this.render();
-
- }
-
- render() {
-
- this.innerHTML = `
-
- <img class=”featured-image” src=”${this._article.featuredImage}”>
-
- <div class=”article-info”>
-
- <h2><a href=”${this._article.id}”>${this._article.title}</a></h2>
-
- <p>${this._article.description}</p>
-
- </div>
-
- `;
-
- }
-
- }
- customElements.define(“article-item”, ArticleItem);
-
-
- articles.js
-
const articles = [
-
- {
-
- id: 1,
-
- title: “Lorem Ipsum Dolor”,
-
- featuredImage: “https://i.picsum.photos/id/204/536/354.jpg”,
-
- description: “Lorem Ipsum is simply dummy text of the printing and typesetting industry. Lorem Ipsum has been the industry’s standard dummy text ever since the 1500s, when an unknown printer took a galley of type and scrambled it to make a type specimen book. It has survived not only five centuries, but also the leap into electronic typesetting, remaining essentially unchanged. It was popularised in the 1960s with the release of Letraset sheets containing Lorem Ipsum passages, and more recently with desktop publishing software like Aldus PageMaker including versions of Lorem Ipsum.”
-
- },
-
- {
-
- id: 2,
-
- title: “Lorem Ipsum Dolor”,
-
- featuredImage: “https://i.picsum.photos/id/209/536/354.jpg”,
-
- description: “Lorem Ipsum is simply dummy text of the printing and typesetting industry. Lorem Ipsum has been the industry’s standard dummy text ever since the 1500s, when an unknown printer took a galley of type and scrambled it to make a type specimen book. It has survived not only five centuries, but also the leap into electronic typesetting, remaining essentially unchanged. It was popularised in the 1960s with the release of Letraset sheets containing Lorem Ipsum passages, and more recently with desktop publishing software like Aldus PageMaker including versions of Lorem Ipsum.”
-
- },
-
- {
-
- id: 3,
-
- title: “Lorem Ipsum Dolor”,
-
- featuredImage: “https://i.picsum.photos/id/206/536/354.jpg”,
-
- description: “Lorem Ipsum is simply dummy text of the printing and typesetting industry. Lorem Ipsum has been the industry’s standard dummy text ever since the 1500s, when an unknown printer took a galley of type and scrambled it to make a type specimen book. It has survived not only five centuries, but also the leap into electronic typesetting, remaining essentially unchanged. It was popularised in the 1960s with the release of Letraset sheets containing Lorem Ipsum passages, and more recently with desktop publishing software like Aldus PageMaker including versions of Lorem Ipsum.”
-
- },
-
- {
-
- id: 4,
-
- title: “Lorem Ipsum Dolor”,
-
- featuredImage: “https://i.picsum.photos/id/212/536/354.jpg”,
-
- description: “Lorem Ipsum is simply dummy text of the printing and typesetting industry. Lorem Ipsum has been the industry’s standard dummy text ever since the 1500s, when an unknown printer took a galley of type and scrambled it to make a type specimen book. It has survived not only five centuries, but also the leap into electronic typesetting, remaining essentially unchanged. It was popularised in the 1960s with the release of Letraset sheets containing Lorem Ipsum passages, and more recently with desktop publishing software like Aldus PageMaker including versions of Lorem Ipsum.”
-
- }
-
- ]
- export default articles;
- style.css
-
- * {
-
- padding: 0;
-
- margin: 0;
-
- box–sizing: border–box;
-
- }
-
- body {
-
- padding: 16px;
-
- }
-
- article–daftar {
-
- display: block;
-
- max–width: 800px;
-
- margin: 0 auto;
-
- }
- article–item {
-
- display: block;
-
- margin–bottom: 18px;
-
- box–shadow: 0 4px 8px 0 rgba(0, 0, 0, 0.2);
-
- border–radius: 10px;
-
- overflow: hidden;
-
- }
-
- article–item > .featured–image {
-
- width: 100%;
-
- max–height: 300px;
-
- object–fit: cover;
-
- object–position: center;
-
- }
-
- article–item > .article–info {
-
- padding: 24px;
-
- }
-
- article–item > .article–info > p {
-
- margin–top: 10px;
- }
Pada kode di atas kita dapat memandang bahwa terdapat dua buah custom component yaitu <article-list> dan <article-item>. Pada article-list.js terdapat fungsi setter articles yang berguna untuk menyimpan nilai articles pada properti this._articles.
-
- set articles(articles) {
-
- this._articles = articles;
-
- this.render();
- }
Kemudian properti itu dipakai pada fungsi render() untuk ditampilkan satu persatu melalui <article-item>.
-
- render() {
-
- this._articles.forEach(article => {
-
- const articleItemElement = document.createElement(“article-item”);
-
- // memanggil fungsi setter article() pada article-item.
-
- articleItemElement.article = article;
-
- this.appendChild(articleItemElement);
-
- })
- }
Dengan seperti itu, untuk menampilkan data pada script.js bakal lebih mudah. Kita tidak harus melakukan proses perulangan lagi di sana sebab proses itu langsung dilakukan saat memakai element <article-list>. Kita cukup memberikan nilai array yang akan ditampilkan.
-
- import “./article-list.js”;
-
- import articles from “./articles.js”;
-
- const articleListElement = document.createElement(“article-list”);
-
- articleListElement.articles = articles;
- document.body.appendChild(articleListElement);
Kian mudah kita memakai sebuah element maka akan kian baik bukan? Meskipun tampak agak sedikit menyusahkan dalam membuatnya, perlu Kamu ingat bahwa web component ini bersifat reusable. Artinya, bila kita mau membuat komponen serupa, kita tak perlu membuatnya dari awal.
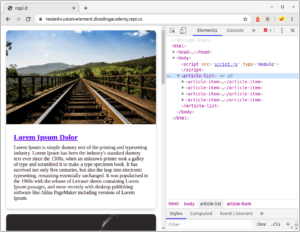
Dengan menjalankan kode di atas, maka hasilnya akan terlihat semacam ini:


[…] JavaScript menawarkan banyak fitur menarik untuk meningkatkan pengembangan aplikasi web. Salah satu fitur yang semakin populer adalah nested custom element. Pada artikel ini, kita akan mempelajari tentang konsep nested element di JavaScript dan bagaimana cara mengimplementasikannya untuk membuat aplikasi web lebih modular dan efisien. […]